Data of the copied/renamed assemblies are given in columns. These data can be changed by entering the text into the selected cell or applying the renaming schemes to the entire column. You cannot change the content of two columns – Current location and Current file name.

The renaming schemes are applied to the active column. The active column has a header highlighted in bold (see the figure above). The column becomes active once you place the cursor on it.
Currently, the Assembly Copier supports the following component renaming schemes:
1.Prefix/Suffix – selects prefix and suffix and component counter.
2.Replace – replaces the text found in the line with that from the selected line.
3.Tree Counter – renames using a hierarchy counter.
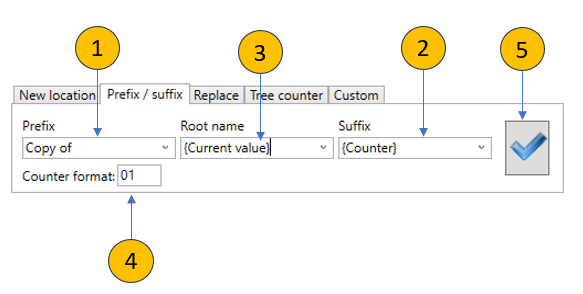
This tab allows setting the renaming template, which requires defining the: 1.Prefix 2.Suffix 3.Base
The user can enter any text for these fields. The following keywords can be used: ▪{Counter} - enters the counter value, which is calculated from the first line in the column and down. ▪{Current value} - this keyword uses the current value found in the column. This keyword can only be used do define the base.
4.Counter format description 5.Opening the renaming scheme
|
If you select this tab, you can perform text search for the line found in the column and replace the text found with another specified text. 1.Text being searched. 2.Text being replaced. 3.Condition – approve each replacement found (Replace). 4.Condition – replacement applies to all the replacements found at once (Replace all). 5.In the line found, replacement applies only to the first instance found.
|
|
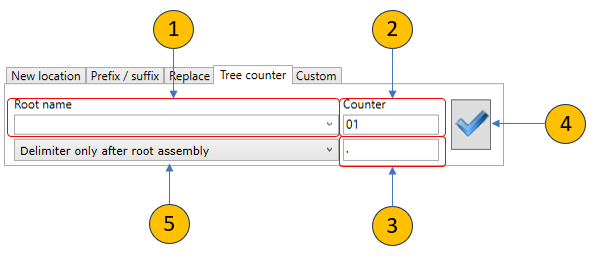
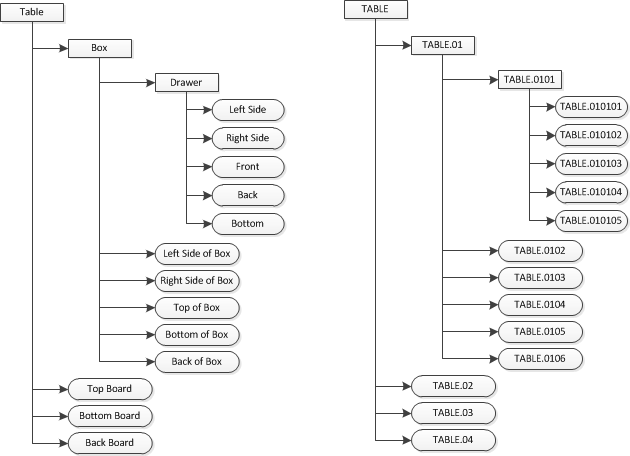
If you select this tab, you can automatically number items based on the assembly hierarchy. As seen in the example below, each assembly level is numbered in sequential order based on the parent component number.
1.Root name - new name of the highest-level component. 2.Counter Format - counter start number. 3.Delimiter - delimiting character between hierarchy levels. The delimiter is placed depending on the delimiter character placement conditions (see point 5 below). 4.Starting the renaming process by assigning hierarchy names. 5.Delimiter character placement conditions. There are three available options: a.Without delimiter - the delimiter is not placed. b.Delimiter only after root assembly - the delimiter is placed only after the new name of the highest-level component. c.Delimiter for each sub-assembly - the delimiter is placed after each number level. For example, in the given example, the new name of the lowest level component would look like this: TABLE.01.01.01
|
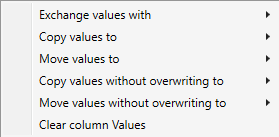
If you want to move the values from one column to another or to exchange values between columns, you can do it by simply placing the cursor on the column header and right-clicking on it to open a contextual menu. You will see the following contextual menu.
1.Exchange values with - exchanges values between the active column and the value of the selected displayed column. 2.Copy values to - copies the values from the active column to a specified column. 3.Move values to - copies the values from the active column to a specified column. Clears values in the active column. 4.Copy values without overwriting to - copies values from the active column to the specified column; however, if the destination already contains any value, it will remain unchanged. 5.Move values without overwriting to - copies values from the active column to the specified column; however, if the destination already contains any value, it will remain unchanged. Clears values in the active column. 6.Clear column Values - clears all column values.
The structure of the displayed columns depends on the configuration of the Assembly Copier options.
|
If you want to change individual column values, you can do it by simply doubling clicking on the selected item or by pressing the "F2" key. This will active a text editing window and you will be able to enter your desired value using your keyboard.
|
|
The user can create their own plug-in using the Assembly Copier API, which will execute the renaming scheme developed by the user. This scheme will be applied when the Assembly Copier program performs the copying or renaming.
To apply a user-developed scheme, go to the Custom tab.
1.In the drop-down list, select the plug-in that will implement the desired renaming scheme. Each plugin you choose gives its name and a short description of what it does in a drop-down list. This information is provided by the person creating the plugin. For more on this, see the Plugin Development API section.
2.If the plugin you want is not listed, you need to create and register it in Assembly Copier. This is a .dll file that is created using the means provided in Assembly Copier API. It must be saved on the computer where the plugin will be used. The user selects this file and it becomes visible in the drop-down list.
3.Running a set plugin. The plugin executes the renaming that is programmed. As a result, the user sees on the screen what has been changed while the plugin is running. Then run the Copy command and the renaming or copying will be done.
|


